Turn your RaspberryPI into a NVR
In my previous blog post, I wrote about how I created a live stream for my old IPCamera device.
Well, it seems there is a much more easier solution than what I’ve done, and that’s the Moonfire NVR.
Moonfire NVR is an open-source security camera network video recorder. It saves H.264-over-RTSP streams from IP cameras to disk into a hybrid format: video frames in a directory on spinning disk, other data in a SQLite3 database on flash. It can construct .mp4 files for arbitrary time ranges on-the-fly. It does not decode, analyze, or re-encode video frames, so it requires little CPU. It handles six 1080p/30fps streams on a Raspberry Pi 2, using less than 10% of the machine's total CPU.
So , All you need to do is to install Docker on RPI, and then execute the following commands :
First, Create a new user
sudo useradd --user-group --create-home --home /var/lib/moonfire-nvr moonfire-nvrthen create the configuration file
echo """
[[binds]]
ipv4 = "0.0.0.0:8080"
allowUnauthenticatedPermissions = { viewVideo = false }

[[binds]]
unix = "/var/lib/moonfire-nvr/sock"
ownUidIsPrivileged = true
""" > /etc/moonfire-nvr.toml
and create compose file after that
mkdir /mnt/nvr && cd /mnt/nvr/
echo """
version: 3
services:
  moonfire-nvr:
    # The `vX.Y.Z` images will work on any architecture (x86-64, arm, or
    # aarch64); just pick the correct version.
    image: ghcr.io/scottlamb/moonfire-nvr:v0.7.11
    command: run

    volumes:
      # Pass through `/var/lib/moonfire-nvr` from the host.
      - "/var/lib/moonfire-nvr:/var/lib/moonfire-nvr"

      # Pass through `/etc/moonfire-nvr.toml` from the host.
      # Be sure to create `/etc/moonfire-nvr.toml` first (see below).
      # Docker will "helpfully" create a directory by this name otherwise.
      - "/etc/moonfire-nvr.toml:/etc/moonfire-nvr.toml:ro"

      # Pass through `/var/tmp` from the host.
      # SQLite expects to be able to create temporary files in this dir, which
      # is not created in Moonfire's minimal Docker image.
      # See: <https://www.sqlite.org/tempfiles.html>
      - "/var/tmp:/var/tmp"

      # Add additional mount lines here for each sample file directory
      # outside of /var/lib/moonfire-nvr, e.g.:
      # - "/media/nvr:/media/nvr"
      - "./recordings:/recordings"
      # The Docker image doesn't include the time zone database; you must mount
      # it from the host for Moonfire to support local time.
      - "/usr/share/zoneinfo:/usr/share/zoneinfo:ro"

    # Edit this to match your `moonfire-nvr` user.
    # Note that Docker will not honor names from the host here, even if
    # `/etc/passwd` is passed through.
    # - Be sure to run the `useradd` command below first.
    # - Then run `echo $(id -u moonfire-nvr):$(id -g moonfire-nvr)` to see
    #   what should be filled in here.
    user: 1001:1001

    # Uncomment this if Moonfire fails with `clock_gettime failed` (likely on
    # older 32-bit hosts). <https://github.com/moby/moby/issues/40734>
    # security_opt:
    # - seccomp:unconfined

    environment:
      # Edit zone below to taste.
      TZ: "America/Los_Angeles"
      RUST_BACKTRACE: 1

    # docker's default log driver won't rotate logs properly, and will throw
    # away logs when you destroy and recreate the container. Using journald
    # solves these problems.
    # <https://docs.docker.com/config/containers/logging/configure/>
    logging:
      driver: journald
      options:
        tag: moonfire-nvr

    restart: unless-stopped

    ports:
    - "8080:8080/tcp"
""" > compose.yml
mkdir recordings
chown moonfire-nvr:moonfire-nvr recording
now it’s time for configuration
docker compose run --rm moonfire-nvr init
docker compose run --rm moonfire-nvr config
create a directory under /recordings and then go to cameras and streams and add your IPCamera Credentials like the below
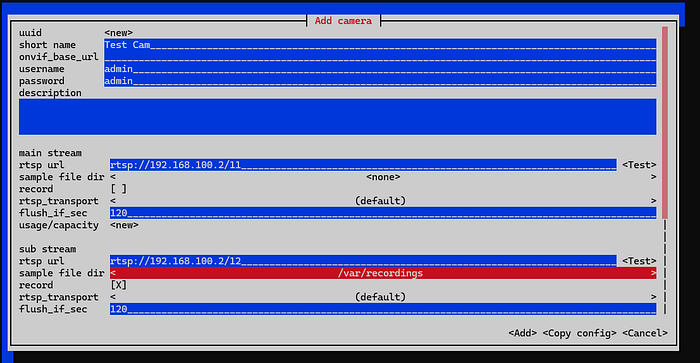
if your camera supports ONVIF you can add the ONVIF as well , so you can have the PTZ but my camera ONVIF is Insecure, so I’ve disabled that completely.
after that, create a user and set the permissions.
and it’s done you can now run the NVR
docker compose up --detach moonfire-nvrif you open the port 8080 on your browser you can see all the recordings
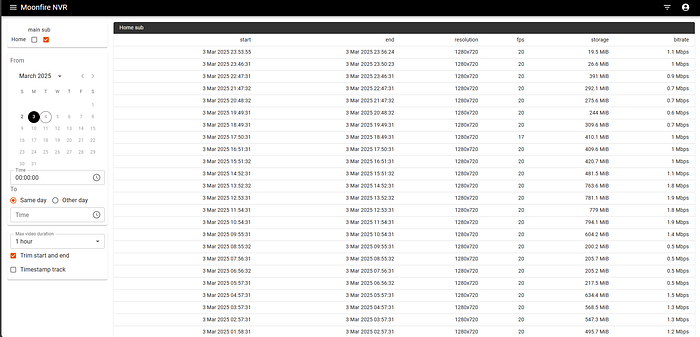
and Live Stream as well

So, That’s it!
Now you can add all your IP Cameras and turn your RPI into a Network Video Recorder.